pytest-jira-xray is a plugin for pytest that uploads test results to JIRA XRAY.
Installing from pypi repository:
pip install -U pytest-jira-xray
Installing from local source:
pip install <path>
Installing from local source in development mode:
pip install -e <path>
Mark a test with JIRA XRAY test ID or list of IDs
# -- FILE: test_example.py

import pytest

@pytest.mark.xray('JIRA-1')
def test_foo():
    assert True

@pytest.mark.xray(['JIRA-2', 'JIRA-3'])
def test_bar():
assert True- Jira base URL:
$ export XRAY_API_BASE_URL=<Jira base URL>- Basic authentication with username and password (default)
$ export XRAY_API_USER=<jira username>
$ export XRAY_API_PASSWORD=<user password>- Personal Access Token authentication (
--api-key-authoption)
$ export XRAY_API_KEY=<api key>- SSL Client Certificate
To disable SSL certificate verification, at the client side (no case-sensitive), default is True:
$ export XRAY_API_VERIFY_SSL=FalseOr you can provide path to certificate file
$ export XRAY_API_VERIFY_SSL=</path/to/PEM file>- Authentication with client ID and client secret (
--client-secret-authoption):
$ export XRAY_CLIENT_ID=<client id>
$ export XRAY_CLIENT_SECRET=<client secret>- Test Execution parameters:
$ export XRAY_EXECUTION_TEST_ENVIRONMENTS="Env1 Env2 Env3"
$ export XRAY_EXECUTION_FIX_VERSION="1.0"
$ export XRAY_EXECUTION_REVISION=`git rev-parse HEAD`

$ export XRAY_EXECUTION_SUMMARY="Smoke tests" # New execution only
$ export XRAY_EXECUTION_DESC="This is an automated test execution of the smoke tests" # New execution only- Upload results to new test execution:
$ pytest --jira-xray- Upload results to existing test execution:
$ pytest --jira-xray --execution TestExecutionId- Upload results to existing test plan (new test execution will be created):
$ pytest --jira-xray --testplan TestPlanId- Store results in a file instead of exporting directly to a XRAY server
$ pytest --jira-xray --xraypath=xray.json- Use with Jira cloud:
The Xray REST API may use two different endpoints: Server+DC or Cloud.
There is a difference between formats of test results (test status can be PASS or PASSED),
so if you want to use this plugin with Xray Cloud endpoint you should run pytest with additional
argument --cloud. This will generate test results with the format accepted by the Cloud service.
$ pytest --jira-xray --cloud- Jira basic authentication:
It is default authentication.
- Jira authentication with Client ID and a Client Secret:
$ pytest --jira-xray --client-secret-auth- Jira Personal access tokens (API KEY) authentication:
$ pytest --jira-xray --api-key-authTests can be marked to handle multiple Jira tests by adding a list, rather than a string. Example:
# -- FILE: test_example.py

import pytest

@pytest.mark.xray([
    'JIRA-1',
    'JIRA-2'
])
def test_my_process():
    assert True
If the test fails, both JIRA-1 and JIRA-2 tests will be marked as fail. The failure comment will contain the same message for both tests.
This situation can be useful for validation tests or tests that probe multiple functionalities in a single run, to reduce execution time.
By default, the jira-xray plugin does not allow to have multiple tests marked with the same identifier, like in this case:
# -- FILE: test_example.py

import pytest

@pytest.mark.xray('JIRA-1')
def test_my_process_1():
    assert True

@pytest.mark.xray('JIRA-1')
def test_my_process_2():
    assert True
However, depending how the user story and the associated test are formulated,
this scenario may be useful. The option --allow-duplicate-ids will perform the tests
even when duplicate ids are present. The JIRA-1 test result will be created according to
the following rules:
- The comment will be the comment from each of the test, separated by a horizontal divider.
- The status will be the intuitive combination of the individual results: if
test_my_process_1is aPASSbuttest_my_process_2is aFAIL,JIRA-1will be marked asFAIL.
Tests can be marked with defects, which will be part of the data uploaded to Xray:
# -- FILE: test_example.py

import pytest

@pytest.mark.xray(
    'JIRA-1',
    defects=['BUG-1', 'BUG-2']
)
def test_with_defects():
    assert True
Note that defects are always present in the data uploaded to Xray, regardless of the test outcome.
The following example adds the test evidences to the Xray report
using a pytest_runtest_makereport hook.
# -- FILE: conftest.py

import pytest
from pytest_xray import evidence

@pytest.hookimpl(hookwrapper=True)
def pytest_runtest_makereport(item, call):
    outcome = yield
    report = outcome.get_result()
    evidences = getattr(report, "evidences", [])
    if report.when == "call":
        xfail = hasattr(report, "wasxfail")
        if (report.skipped and xfail) or (report.failed and not xfail):
            data = open("screenshot.jpeg", "rb").read()
            evidences.append(evidence.jpeg(data=data, filename="screenshot.jpeg"))
report.evidences = evidencesThere is possibility to modify a XRAY report before it is send to a server by pytest_xray_results hook.
def pytest_xray_results(results, session):
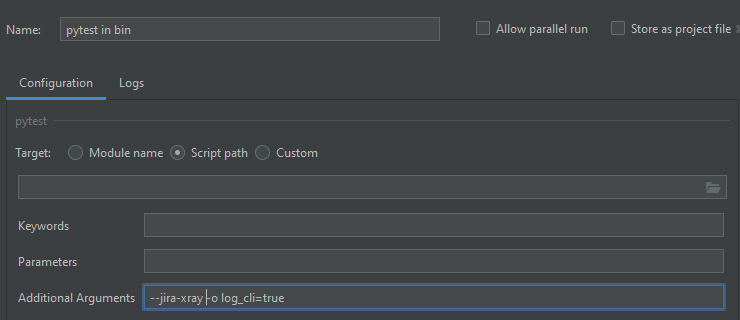
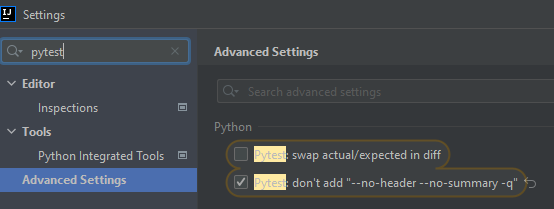
results['info']['user'] = 'pytest'When you want to synchronize your test results via. Pytest integration in IntelliJ, you need to configure the following:
- Use the pytest test configuration template and add
--jira-xray -o log_cli=trueto Additional Arguments

- Disable --no-summary in Settings

This section holds information about common issues.
- Problem: The test is not executable by the user.
- Solution: Make sure, that your test is not deactivated, approved and ready to use in Jira.
- Problem: The version is malformed or doesn't exist.
- Solution: Make sure the version exists and the name matches the existing version and that only one version is used.
- XRay import execution endpoint: https://docs.getxray.app/display/XRAY/Import+Execution+Results